MS-Windows용 FFMPeg 라이브러리와 실행 파일을 빌드하는 방법
Visual Studio를 사용하지 않고 오지 MinGW 64Bit GCC 만을 이용하여 빌드하는 방법을 소개합니다.
여러가지 빌드 방법이 올라와 있지만 오래전 내용이고 설정 내용도 부실하여 잘 안되시는 분들은 아래 방법을 사용하세요.
1. MSYS 1.0 과 MinGW 64 bit 설치
아래 링크 파일을 다운로드하여 C:\MinGW 폴더를 만들고 그안에 압축을 풉니다.
http://www.digipine.com/files/MinGW_w64_build_ffmpeg_x264_265.zip
* msys 1.0 환경을 개별 설정하기가 매우 어려워서 제가 설정한 첨부파일을 다운로드 하여 압축을 해제하는 것이 새용하기 편할 것 입니다.
환경 변수에 PATH에 아래 값을 등록합니다.
C:\MinGW\bin
C:\MinGW\msys\1.0\bin
C:\MinGW\mingw-w64\mingw64\bin
PATH가 정확한지 확인 해야 합니다. 틀릴 경우 gcc가 동작하지 않습니다.
GCC 설치 확인 : C:\MinGW\msys\1.0에 있는 msys.bat를 실행하면 커맨드 창이 뜨는데 여기에서 gcc라 입력하고 엔터를 치면 다음과 같은 에러 메시지가 나와야 정상적으로 설치 된 것이다.
$ gcc
gcc.exe: fatal error: no input files
compilation terminated.
msys 에서 빌드 소스가 있는 디렉토리로 이동하려면
cd /c/User/Simon/Source/ffmpeg
와 같이 명령을 주면 됩니다. "/c/" 는 C:\ 드라이브이고 이후부터는 폴더 명을 그대로 사용합니다.
빌드를 위한 소스 코드는 각 공식 사이트에서 최신 버전을 직접 받으세요.
링크가 바뀌어는 직접 사이트를 방문하여 받는 것이 필요합니다.
2. x264 빌드
ffmpeg 빌드 전에 아래와 같이 빌드
./configure --enable-static --host=x86_64-w64-mingw32 --cross-prefix=x86_64-w64-mingw32-
make
make install
이후
make
make install
4. FFMpeg BuildFFMpeg Build Config
드디어 빌드.. 소스 코드는 ffmpeg 공식 사이트에서 받으세요.
./configure --arch=x86_64 --enable-yasm --enable-asm --enable-gpl --enable-version3 --enable-w32threads --extra-cflags='-I/usr/local/include' --extra-ldflags='-L/usr/local/lib' --disable-debug --disable-doc --enable-libx264 --enable-libx265 --prefix=./install --enable-static --pkg-config-flags=--static

make
make install
* pkg-config-flags=--static 추가해주어야 링크에러가 발생하지 않는다.
빌드된 파일은 install 폴더 모여 있습니다.
* dll 을 빌드하기 위해서는 --enable-static 을 --enable-shared 로 변경하고 빌드하면 됩니다.
How to build FFMPeg libraries and executables for MS-Windows
This tutorial will show you how to build with Oxy MinGW 64Bit GCC without Visual Studio.
There are many different build methods, but if you have not done so for a long time,
1. MSYS 1.0 and MinGW 64 bit Installation
Download the link file below to create the C: \ MinGW folder and unzip it inside.
http://www.digipine.com/files/MinGW_w64_build_ffmpeg_x264_265.zip
* It is very difficult to set up an individual msys 1.0 environment, so it would be a good idea to download and unzip the attachments I set up.
Register the following value in your PATH for the environment variable:
C:\MinGW\bin
C:\MinGW\msys\1.0\bin
C:\MinGW\mingw-w64\mingw64\bin
Make sure your PATH is correct. If not, gcc will not work.
Confirm GCC installation: When you run msys.bat in C:\MinGW\msys\1.0, a command window pops up.
Enter gcc here and hit Enter. >
$ gcc
gcc.exe: fatal error: no input files compilation terminated.
To move to the directory where the build source is located in msys
cd/c/User/Simon/Source/ffmpeg
You can give commands like "/c/" Is the C:\ drive and will continue to use the folder name from now on.
For the source code for the build, please get the latest version directly from each official site.
If the link changes, you will need to visit the site yourself.
2. x264 build ffmpeg Build
./configure --enable-static --host = x86_64-w64-mingw32 --cross-prefix = x86_64-w64-mingw32-
make
make install
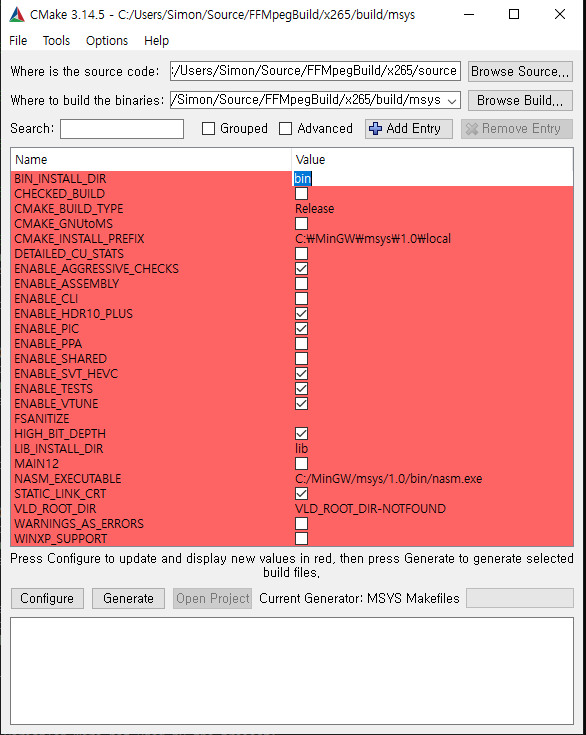
3. x265 build

Since
make
make install
4. FFMpeg BuildFFMpeg Build Config
Finally, build ... & nbsp; Get the source code from the ffmpeg official site.
./configure --arch = x86_64 --enable-yasm --enable-asm --enable-gpl --enable-version3 --enable-w32threads --extra-cflags = -disable-debug --disable-doc --enable-libx264 --enable-libx265 --prefix = ./install --enable-static --pkg -config-flags = - static

make
make install
* pkg-config-flags = - static Do not add link errors.
The build file is located in the install & nbsp; There are folders.
* To build the dll, change --enable-static to --enable-shared and build.

